Look for songs
Member posts
Streaming Radio


New stories
Active forum topics
Sibelius 6 Quick Tip: Object Check 4: keyboard fingerings
Engraving Rules for keyboard fingerings:
- In keyboard music, fingerings for the right hand go above the staff, for the left hand go below the staff.
- Whenever there are 2 voices on a single staff, the fingerings for the upper voice go above the notes, for the lower voice go below the notes.
- Horizontally, the fingerings need to be centred above/under the note head, vertically they follow the flow of the notes.
- Tuplets should be moved to the other side of the notes if necessary, to avoid collisions.
To work fast when working with fingerings in keyboard music, I use two text styles: one for above the staff (Sibelius-default) and a second one for below the staff. The second one has exactly the same settings as the default fingering text style, but places them below the staff. To create this second text style, go to Text styles/fingering and choose New to create a text style based on the default fingering style:
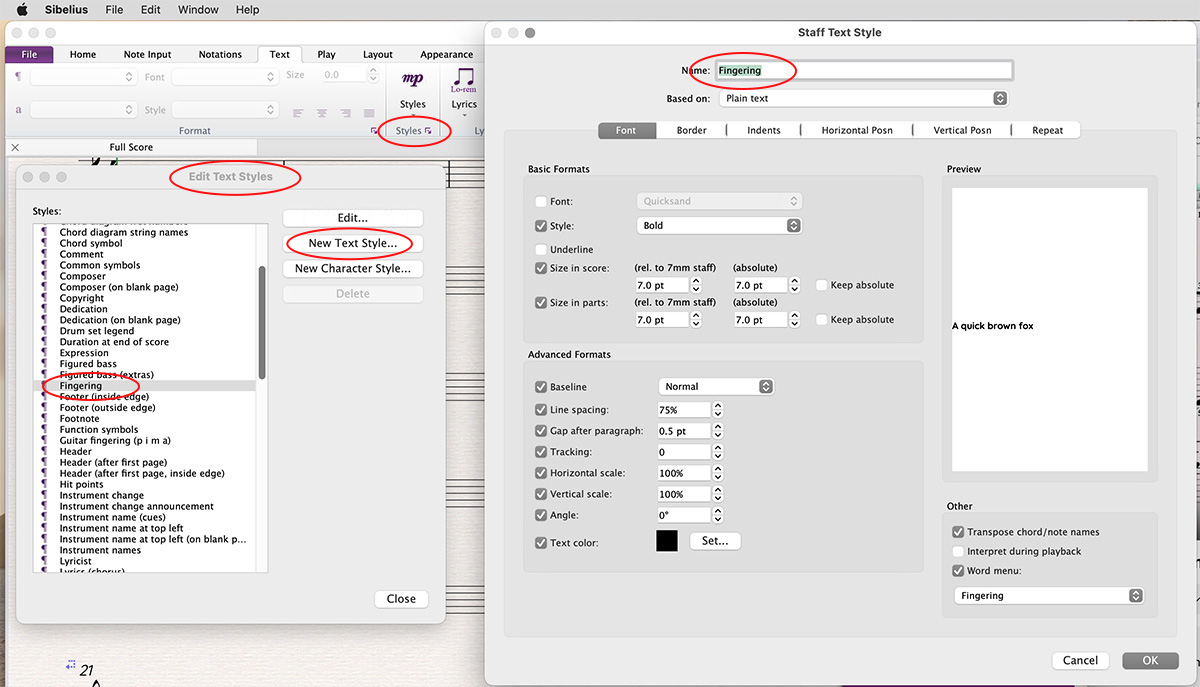
Here are the text style settings for fingerings that I use for fingerings above the staff, and which are now copied for the fingerings below the staff style:
- Text Styles: times Roman 7 - Bold
Border: erase background. Set right/left of text to 5%
Horizontal position: align to note: centered.
I saved the settings as Fingerings below staff:

To get the this new style placed below the staff, go to Default positions:


Here you can see the horizontal and vertical position of the fingerings relative to Note and Staff:
My settings are Horizontal position relative to note: 0.69 - Vertical position relative to staff: 1.5
But more important, in the lower part of the screenshot you see: Below bottom of Staff.
This is where Sibelius decides if the fingerings will be written below or above the staff.
Now we have two different fingerings styles ready to go, all we have to do is to change the fingerings in the score in left hand staff. Start with triple clicking on the left hand staff to select the staff in the full score and use the Advanced Filter/Text/Fingering to select the fingering:

Now in the Properties window choose the Fingering Below Staff style that we made earlier:

and from the Layout menu, choose Reset Position:

All the Fingerings will now move below the staff.
The Magnetic layout for fingering is by default enabled, which is done in Layout/Magnetic Layout Options. Fingering is part of Misc.Text:

All that is left now is to adjust the position of the text where needed. To move a single fingering text, select it and use the mouse or arrow keys. Use the arrow key to move the selected fingerings one step at the time and use CMD+arrow key to move them over a longer distance.
To select the fingering in a lot of bars, first select those bars and then choose from the Edit menu Advanced Filter/Text/Fingering as shown in the screenshot above. It’s a good idea to use a keyboard shortcut to work faster. To create it, go to Preferences/Menu’s and Shortcuts/Edit/Filter Staff Text. I have to choose Staff Text here, because there is unfortunately no Fingerings to choose from. Click the Add button and assign a keyboard key that is available. I used the F12 key for this and labeled the key on my keyboard to avoid forgetting which key I assigned it to:

Now when you select a lot of bars and hit the Keyboard key that you assigned just now, the fingerings will be selected but it will also select the expression style which is part of the Staff Text style. You can un-select them by holding down the CMD key and clicking them.
The last thing I do is exporting the changes I made to my Piano solo House Style so I have these fingerings styles available when working on another piano piece.
Check out the video below to see everything in this newsletter in action:
I hope you liked this tip and made working in Sibelius 6 again a little easier.
See you in the next tip!
All the best,
André